Draw Calls optimisation for similar Meshes
Performance optimization has been a constant concern in game development since the very beginning. Despite decades of hardware progress, the challenge has not disappeared: it has simply moved. As scenes grow more ambitious, the number of objects an engine must process every frame grows with them. The gap between what artists want to create and what hardware can render in real time remains as real as ever, and draw calls sit right at the center of that tension.
Context
As I wrote before (Unreal Engine 5 is not just a performance problem, it is a UX problem), for me, a freelance graphics programmer and technical artist, the major issue around performance is the user experience provided by the graphics tools in game engines.
Technologies like Nanite, SRP Batcher, and Virtual Textures are incredibly powerful, but most documentation and settings assume that you UNDERSTAND what’s happening on the hardware. In reality, this is often not the case. Graphics programming is a specialty in its own right, and not everyone wants or can learn how a GPU works.
This article explains how game engines send instructions to the GPU and how to manage performance when dealing with many similar meshes, such as in City Builders or RTS games.
A] Glossary
- Mesh: Mathematical representation of a 3D object using vertices and triangles.
- Shader: The GPU program, meaning the actual code that runs on the graphics card. A shader defines how something is drawn: how light reacts, how colors blend, how vertices are displaced. It can be: - Vertex shader: Runs once per vertex of a mesh. - Fragment shader: Runs once per pixel of a mesh. - Compute shader: Runs manually on the GPU for parallel tasks unrelated to drawing.
- Material: A configured instance of a shader. If a shader is a recipe, a material is the recipe filled in with specific ingredients: the actual textures, colors, and numeric values. Two objects can use the same shader but have different materials (different textures, different colors). This distinction matters a lot for optimization.
- Draw Call: An instruction sent to the GPU to render an object. Each draw call has a setup cost, regardless of object complexity.
- Instance Buffer: A GPU-side array that stores per-instance data (position, rotation, scale, color, etc.) for GPU Instancing. Each instance reads its own parameters from this buffer using a unique instance ID, with no CPU involvement per draw.
- Culling: The process of determining which objects or geometry clusters are not visible to the camera and skipping them before rendering. Can happen on the CPU or on the GPU
- Meshlet: A small cluster of triangles (typically 64–128) that a mesh is pre-split into for use with Mesh Shaders. The Task Shader evaluates each meshlet independently and discards invisible ones before any geometry is processed.
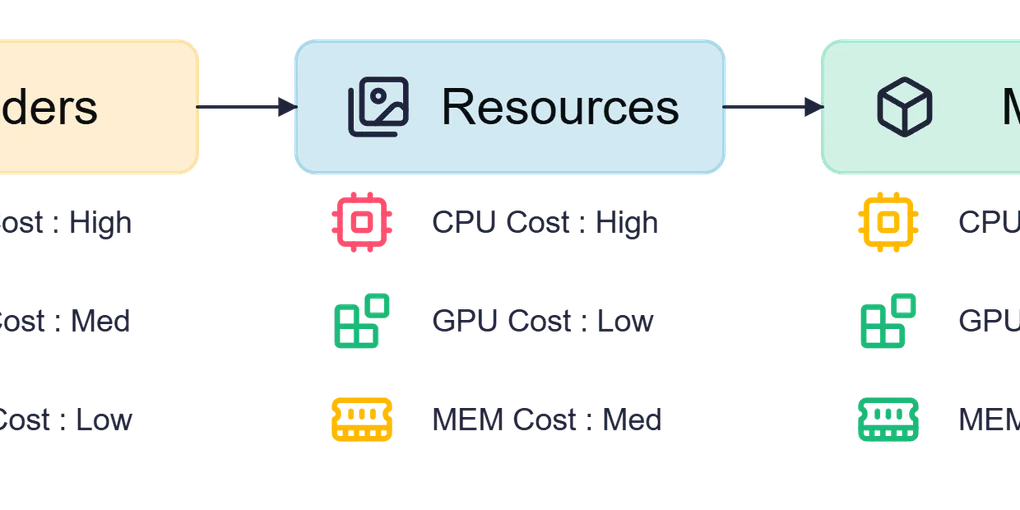
B] How do we render an object?
Although the underlying code is complex, we can simplify the rendering process into these essential steps:
- Set up the pass: Define where and how we render (Opaque, Transparent, Post-Process, etc.)
- Set up the Shader: Choose which GPU program to run
- Set up the Resources: Provide the material data: textures, constants (light direction, camera position, object position, etc.)
- Set up the Mesh: Load the geometric data (vertices, triangles)
- Draw: Send the final instruction to the GPU
Each of these steps involves telling the GPU to change its current configuration. These state changes are not free: the GPU has to flush, reconfigure, and prepare for the next instruction. The more objects you have, the more times this happens per frame.
These 5 steps are mandatory for every object we want to render, but we can be smart about it.
.C_1yO59__Z1SEXRV.svg)
C] Basic Optimization: Shader Grouping and Batching
Here lies the first optimization opportunity: we don’t need to reconfigure every step for each object.
If two objects use the same pass and the same shader, we can configure them once and render multiple objects without repeating that setup. This is one of the first optimization guidelines, and something game engines make accessible through their visual shader editors. In both Unity and Unreal, creating Uber Shaders is straightforward.
What is an Uber Shader?
An Uber Shader is a single shader that handles many different visual looks by using keywords and variants to switch behaviour on or off at compile time.
Instead of writing one shader for “tree with wind”, another for “tree without wind”, another for “tree with snow on top”, you write a single shader with toggles: WIND, SNOW, and so on. The engine compiles one version of the shader per combination of active keywords; each compiled version is called a variant.
An Uber Shader lets multiple materials share the same underlying code, which removes the GPU cost of switching between shader programs.

The tradeoff is variant bloat: too many keywords and the number of compiled variants explodes exponentially, causing those long “Compiling Shaders” loading screens when launching a game. In practice, keep the number of keywords small and meaningful, and strip unused variants from your builds.
Both Unity (ShaderGraph keywords, multi_compile / shader_feature directives) and Unreal (Static Switch Parameters in Materials) expose this pattern natively.
But grouping shaders is just the beginning. What about the mesh setup and the draw itself? This is where Batching comes in.
What is Batching?
Batching is a technique that combines multiple different meshes into a single large mesh (a “batch”), which the GPU renders in a single draw call. Think of it like merging several small packages into one big box before shipping: one trip instead of many.
How it works
- The engine scans the scene for meshes that share the same material (same shader + same parameter values)
- It merges their geometry into a single mesh: all vertices and triangles are combined
- That merged mesh is sent to the GPU as a single draw call
⚠️ Shader vs Material, why it matters here: Batching requires the exact same material, not just the same shader. Two trees with the same shader but different bark textures have different materials and cannot be batched together. This is the most common mistake when troubleshooting why batching isn’t working.

Types of batching
Static Batching
- Meshes must be immobile and unchanging
- Merging happens at compile time or initial setup, with no runtime cost
- Significant performance gain
- Example: Buildings, rocks, fences in an environment
Dynamic Batching
- Meshes can move and change
- Merging happens every frame at runtime
- Less efficient than static batching, but more flexible
- Higher CPU cost; use sparingly
Requirements
- Meshes must share the exact same material (same shader AND same parameter values)
- Meshes must not exceed a size limit in vertex count (Unity: 300 vertices per mesh for dynamic batching; Unreal has similar internal limits)
- Objects should be marked as static in the engine when possible
Advantages
- ✅ Works with different meshes
- ✅ Reduces draw calls with minimal setup
- ✅ No code required (handled automatically by most engines)
Disadvantages
- ❌ Dynamic batching increases CPU load every frame
- ❌ Once merged, individual meshes cannot be modified independently
- ❌ All batched meshes must share the exact same material
Warning
- ⚠️ Batching increases individual draw call size, which can be counterproductive on Tiled GPUs (Mobile, Switch, VR)
A note on state caching: SRP Batcher (Unity) and GPU Scene (Unreal)
Both Unity and Unreal ship a system that optimizes the cost of draw calls rather than their count. Understanding the difference is important.
Unity, SRP Batcher: Often described as a batching solution, it actually works differently. The SRP Batcher does not reduce the number of draw calls. Instead, it caches shader constant data (material properties, object transforms) in persistent GPU-side buffers. If nothing has changed for a given object, the engine skips re-uploading that data entirely. The limiting factor is the shader, not the material: objects with different materials can still benefit.
Unreal, GPU Scene: Unreal Engine 5 maintains a persistent GPU-side scene buffer that stores per-object data (transforms, material parameters) for all objects in the world. Instead of uploading per-object data every frame, only changes are uploaded. The renderer then reads directly from this buffer when building draw commands. This is the foundation that makes Nanite and Lumen’s massive scene support practical.
Both systems follow the same principle: keep GPU data persistent, update only what changed.
| Technique | Reduces draw call count? | Limiting factor | Engine |
|---|---|---|---|
| Static / Dynamic Batching | ✅ Yes | Same material | Both |
| SRP Batcher | ❌ No (reduces cost per call) | Compatible shader | Unity |
| GPU Scene | ❌ No (reduces upload cost) | Scene object registration | Unreal |
D] Going further: GPU Instancing
Batching is great for diverse environments, but what if you need to render the same mesh hundreds or thousands of times, like trees in a forest, soldiers in an army, or houses in a city? Batching would merge an ever-growing mesh into memory and hit its size limits quickly. GPU Instancing is the right tool here.
What is GPU Instancing?
Instancing allows you to render the same mesh multiple times with per-object variations (position, rotation, color, etc.) in a single draw call. Instead of sending 1000 draw calls for 1000 identical trees, you send just 1.
How it works
- Prepare an Instance Buffer: an array stored on the GPU containing the unique parameters for each instance (position, rotation, color, etc.)
- The shader reads this buffer; each instance has a unique ID it uses to fetch its own data
- Send a single instruction to the GPU: “Render this mesh N times, reading parameters from the buffer”
⚠️ Shader vs Material, why it matters here: Instancing requires the same shader (with instancing support), but unlike batching, instances can have different material property values since those values are stored per-instance in the Instance Buffer. This is what makes instancing more flexible than batching for repeated objects.

Requirements
- The same mesh must be used across all instances
- The same shader must explicitly support GPU Instancing
- Per-instance variations are limited to what’s declared in the Instance Buffer
Advantages
- ✅ Drastically reduces draw calls for repeated meshes
- ✅ Very low overhead (data stays on the GPU)
- ✅ Scales well to thousands of instances
- ✅ Per-instance variation is possible (color, scale, etc.)
Disadvantages
- ❌ The shader must be written to support Instancing
- ❌ Only practical when the same mesh is reused many times
- ❌ All instances share the same geometry
Do I need to write code?
It depends on the engine and what you need:
Unity, no code required for basic instancing: enable GPU Instancing via the checkbox in the Material inspector, and Unity handles transforms automatically for compatible shaders.
Unity, code required as soon as you want to vary a custom property per instance (say, each house has a different tint): you need MaterialPropertyBlock in C# to feed per-instance data.
In Unity’s DOTS/ECS it’s way simpler, just add a IComponentData with a MaterialProperty attribute to automatically include data in the Instances Buffer. Accessible in the shadergraph by declaring property in the “Per Instance” scope.
Unreal, no code required for most use cases: the Instanced Static Mesh (ISM) component handles instancing transparently at the component level. You add instances through the editor or via Blueprint nodes, without writing C++. Unreal also applies instancing automatically to objects placed via the Foliage Tool or World Partition streaming. ISM allows Custom Data.
A note on LOD
Instancing and LOD (Level of Detail) work together, but the setup differs between engines.
In Unreal, prefer HISM (Hierarchical Instanced Static Mesh) over plain ISM when your asset has multiple LODs. HISM automatically picks the right LOD per instance based on screen coverage and uses GPU Instancing for all LODs.
Unreal, World Partition: As a bonus, Unreal’s World Partition system automatically applies HISM to all placed instances. This means you get instancing benefits (merged draw calls) without manually setting up ISM components. It’s a ‘set it and forget it’ approach for large worlds.
In Unity, LOD management is more manual. Graphics.DrawMeshInstanced() draws a single mesh at a time, so you have to split instances by distance bucket and issue one draw call per LOD yourself.
Unity 6’s GPU Resident Drawer handles LOD transitions automatically for compatible scene objects.
E] Pushing limits further: Vertex Animation Texture (VAT)
GPU Instancing is very powerful and in most cases more than enough. But for extreme applications like City Builders, RTS, or 4X games, where you need many instances of different meshes, you can push even further.
What is a VAT?
A Vertex Animation Texture is a technique that encodes mesh geometry directly into a texture. Instead of storing a mesh the traditional way (arrays of vertex positions, normals, UVs), you write each vertex’s attributes (Position, Normals, UVs) into a pixel of a texture:
- Red (R) = Position X
- Green (G) = Position Y
- Blue (B) = Position Z
The vertex shader then reads this texture at runtime to reconstruct the geometry.

Why textures?
Because textures scale exponentially:
- A 512×512 texture can store up to 262,144 vertices
- A 2048×2048 texture can store up to 4,194,304 vertices
A single texture can hold dozens of distinct mesh variants. Combined with GPU Instancing, each instance simply reads a different region of the texture to get its unique shape while the engine still sees a single mesh.
The cost: GPU tension
Reading a texture in a vertex shader is expensive on the GPU. VAT offloads work from the CPU (fewer draw calls, less mesh data to upload), but puts more pressure on the GPU. Before using VAT, identify your bottleneck: are you CPU-limited or GPU-limited?
VAT and animation
VAT shines for animated meshes. If a mesh has 5000 vertices, you can store it in the first 10 rows of a 512×512 texture, leaving room for 50 copies side by side. This means you can encode an entire animation sequence (every frame) in a single texture. Very useful for crowds, fluids, and cloth simulations.

VAT for non-animated cases
I believe VAT is underused for static variation. In a City Builder for example:
- “Houses” category: 20 variants stored in a single VAT
- “Cars”: 15 variants, one texture
- “Trees”: 30 variants, one texture
Each instance points to a different region in the texture to get its unique shape, while the engine still sees a single mesh and a single draw call per category. This method works well if all meshes have a similar number of faces/vertices.

Do I need to write code?
Yes, always. VAT requires a custom shader in every case. The vertex shader has to read the texture at the right UV coordinates and reconstruct vertex positions from the pixel color values. And a baker is usually needed to convert classic Mesh to VAT.
Engine support
Unity: VAT has no native editor support: you bake the textures externally (Houdini, a custom tool, or the baker described below) and reconstruct the geometry in a custom shader written in ShaderGraph or HLSL.
Unreal Engine: Has significantly better out-of-the-box support. SideFX Houdini ships an official Houdini Engine plugin for Unreal with a dedicated VAT exporter that generates correctly formatted textures and a ready-to-use Material function you can drop into your Material Graph. Unreal’s Material Editor also makes it straightforward to build a VAT reader manually using Texture Sample nodes with explicit UV offsets, with no code required. This workflow is well-documented in the community, particularly for destruction and crowd simulations baked from Chaos or Houdini solvers.
💡 Sections F and G go deeper into engine internals. If you are not writing rendering code yourself, feel free to read them as background: they explain what the engine is already doing for you under the hood, and help make sense of features like Nanite or the GPU Resident Drawer.
F] Indirect Rendering
All the techniques covered so far (batching, instancing, and VAT) still involve the CPU preparing render commands and sending them to the GPU. For very large scenes, this CPU-to-GPU communication itself becomes the bottleneck. Indirect Rendering removes it almost entirely.
The concept
With Indirect Rendering, the GPU generates its own draw commands. The CPU only prepares a buffer of potential draw instructions, uploads it once, and then tells the GPU: “Execute whatever is in this buffer.” A Compute Shader running on the GPU can then fill, filter, and modify that buffer entirely on its own, with no CPU involvement per frame.
Think of it this way: instead of a manager (CPU) telling each worker (GPU thread) what to do every single day, you write a rulebook once, hand it to the team, and let them organize themselves. Put differently, it is GPU Instancing taken further: instead of the CPU building the instance buffer, the GPU populates and filters it almost entirely on its own.
How it works
- The CPU prepares a command buffer (the “indirect buffer”) containing draw instructions: which mesh, how many instances, which data to use
- A Compute Shader runs on the GPU and modifies this buffer. For example, it can remove objects outside the camera frustum (GPU-side culling), adjust instance counts, or reorder draws
- The CPU issues a single call:
DrawIndirectorDrawMeshInstancedIndirect - The GPU executes all the commands from the buffer autonomously

Why it’s powerful
The key advantage is GPU-driven culling. In traditional rendering, the CPU checks which objects are visible before submitting draw calls for them. This works, but it is inherently serial: the CPU must iterate over every object, every frame.
With Multi-Draw Indirect (MDI), the GPU takes over this job entirely. You can send multiple meshes to the GPU and the compute shader will decide where to draw them. This is what enables scenes with millions of trees, rocks, or buildings rendered at full speed.
Engine support
Indirect rendering requires code in both engines. There is no enable checkbox. You need to write a Compute Shader that populates and culls the command buffer, and manage GPU buffers manually. This is advanced territory, typically owned by engine programmers or technical artists with graphics programming experience.
Unity: Graphics.DrawMeshInstancedIndirect() has been available since Unity 2017 and gives full manual control over the indirect buffer. Unity 6 introduces the GPU Resident Drawer, which applies indirect-style rendering automatically to compatible scene objects, removing the need for manual buffer management.
VFXGraph relies heavily on Indirect Rendering.
Unreal Engine: Indirect rendering is used extensively under the hood, and Unreal 5 exposes it at several levels:
- Niagara GPU simulations use
DrawIndirectto render millions of particles driven entirely by GPU compute, with zero per-particle CPU cost. - Nanite takes this further: it maintains a persistent GPU scene and dispatches rendering commands generated entirely on the GPU, culling at the cluster level before any rasterization happens.
- For custom rendering code, indirect dispatch is accessible via Unreal’s RHI (Rendering Hardware Interface) layer and the Render Dependency Graph (RDG), which manages GPU resource lifetimes and synchronization automatically.
- The Custom Depth Pass and Custom Primitive Data systems let you feed per-object data into Unreal’s GPU Scene for use in indirect rendering contexts without dropping to raw RHI code.
G] The frontier: Mesh Shaders
All the techniques above work within the traditional GPU pipeline, which processes every vertex of every mesh in a fixed order, whether the result is visible or not. Mesh Shaders fundamentally change this: instead of sending the GPU a list of vertices to work through, you give it chunks of geometry and let it decide what is worth rendering before any real work begins.
Two new programmable stages replace the old vertex pipeline:
- Task Shader: Runs first and acts as a filter. It evaluates clusters of geometry and discards anything irrelevant: off-screen, occluded, too distant. No triangles are wasted on things that will never appear on screen.
- Mesh Shader: Takes the surviving clusters and outputs the actual primitives to be rasterized. Unlike the vertex shader, it is not tied to a fixed buffer format and can generate geometry from any data source.
Meshlets
For this pipeline to work, a mesh is pre-split into small clusters of triangles called meshlets (typically 64–128 triangles each). A single rock might become 10 meshlets; a building, hundreds.
The Task Shader evaluates each meshlet independently. If a meshlet is behind the camera, outside the view frustum, or hidden behind another object, it is discarded before any geometry is processed. This is far more granular than culling at the object level: you skip individual faces of an object, not just whole objects. At scale, it changes what is even possible to render in a single frame.
In practice
Unreal Engine, Nanite: The most accessible real-world implementation is Nanite, Unreal Engine 5’s virtualized geometry system. Nanite decomposes every mesh into clusters (analogous to meshlets), stores them in a specialized streaming format, and lets the GPU decide at runtime which clusters to render, at what resolution, and whether they can merge with neighbors. The CPU never iterates over individual triangles. Polygon budgets essentially disappear for static geometry: you can import a 50M polygon scan and Nanite handles the rest.
Enabling Nanite is a single checkbox on the Static Mesh asset. Knowing the underlying mechanism helps you understand its limits: no support for skeletal meshes, highly transparent surfaces, or objects that require vertex shader deformation.
For custom Mesh Shader passes outside of Nanite, you would work with the RDG and write HLSL directly, which is engine-level code beyond typical project work.
Unity: Mesh Shaders are not yet exposed through a high-level Unity API. Implementing them requires HLSL Mesh and Task Shaders targeting DirectX 12 or Vulkan, mesh decomposition into meshlets via a library like meshoptimizer, and low-level API access through Unity’s CommandBuffer. This is significantly more involved than anything else covered in this article.
For most projects in either engine, Mesh Shaders are not something you write yourself. Their value today lies in understanding what Nanite and future engine features are doing under the hood.
A critical note on when Nanite pays off
Nanite is powerful, but it is not a magic checkbox. The technology shines with dense static geometry: million-polygon scans, detailed architectural props, high-detail landscapes. In these cases, compression and meshlet streaming dramatically reduce memory peak usage and CPU overhead compared to traditional rendering.
However, there are traps:
-
Do not enable Nanite on simple geometry. A single door frame or a basic rock does not benefit. The indirection overhead (cluster lookup, decompression) outweighs any culling gain.
-
Do not mix Nanite and non-Nanite rendering expecting seamless quality. If half your scene is Nanite static geo and half is traditional meshes, you are not gaining much: the CPU still submits draw calls for the non-Nanite objects, and you are now managing two rendering systems. The efficiency win shrinks.
-
Do not assume Nanite solves memory. A 50M polygon scan compresses well, but it still must stream into VRAM. If your camera can see the entire scene at once (top-down RTS view, for example), you will load most meshlets regardless of culling. Nanite is not a substitute for level design or graphics programming (Instancing, Indirect).
-
Do use Nanite for what it is built for: static, visually dense, high-polygon-count content where traditional LOD management becomes impractical. Nanite removes the polygon budget ceiling for static geometry. Outside that scope, it adds complexity without proportional gain.
Hardware and API support
Mesh Shaders require:
- DirectX 12 Ultimate (Windows, Xbox Series X/S)
- A GPU from the NVIDIA Turing generation (RTX 20xx) or AMD RDNA 2 (RX 6000) or newer
⚠️ Not supported on mobile, older consoles (PS4, Xbox One), or older desktop hardware.
H] What about Godot?
Godot doesn’t appear in the comparisons above because its coverage of these techniques is uneven, which is why it gets its own section, especially since Godot 4’s Vulkan backend opened the door to a lot of what was previously impossible.
What Godot does well
MultiMesh (MultiMeshInstance3D) is Godot’s equivalent of GPU Instancing and works well. You define a mesh, fill a buffer of per-instance transforms and custom data, and Godot submits a single draw call. It’s straightforward to use from GDScript or C#, and it covers the core use case of rendering thousands of identical objects efficiently.
For the SRP Batcher equivalent, Godot 4 introduced a batching system for 2D rendering and uses Vulkan descriptor sets more efficiently on the 3D side, reducing per-draw overhead, similar in spirit to what Unity’s SRP Batcher does.
Where it falls short
VAT is technically possible in Godot 4 (you can write a custom shader that reads a texture in the vertex stage), but there is no official tooling or plugin equivalent to the Houdini pipeline for Unreal. You’re on your own for baking and shader setup.
Indirect rendering and Mesh Shaders are where the gap really shows. Godot 4 does not expose indirect draw commands or Mesh Shader stages through its public API. Compute shaders are available via RenderingDevice, but building a full GPU-driven pipeline requires dropping into the low-level Vulkan abstraction layer. There is no equivalent to Unity’s DrawMeshInstancedIndirect() or Unreal’s RDG.
Godot is often presented as a near-equivalent to Unity or Unreal for 3D. In my experience, that comparison undersells the gap. The distance between Unity and Unreal on GPU-driven rendering is real but shrinking fast. The distance between Unity and Godot on the same topics is, today, much wider, and it is structural: Godot’s rendering architecture is still catching up to where Unity was five years ago. That is not a criticism of the project, it is a remarkable open-source effort, but it is worth being honest about if you are choosing an engine for a performance-sensitive 3D project.
Quick Reference
When to use which technique
| Situation | Recommended Technique |
|---|---|
| Varied objects, same material | Batching |
| Same mesh repeated thousands of times | GPU Instancing |
| Same mesh, visual variants | GPU Instancing + Instances Buffer |
| Different meshes, extreme performance | VAT |
| Massive scenes, GPU culling | Indirect Rendering |
| Unreal, all static geometry | Nanite |
How techniques map to engine features
| Technique | Unity | Unreal | Godot |
|---|---|---|---|
| Draw call cost reduction | SRP Batcher | GPU Scene | Vulkan descriptor caching |
| Batching | Static / Dynamic Batching | Static / Dynamic Batching | Static Batching (2D only) |
| GPU Instancing | Material checkbox, Graphics.DrawMeshInstanced | ISM / HISM, Foliage Tool | MultiMeshInstance3D |
| GPU Instancing Custom Data | Entities Graphics (Hybrid Renderer) | ISM Custom Data | N/A |
| Vertex Animation Texture | Custom shader (ShaderGraph / HLSL) Assets available in Store / Houdini | Houdini Engine plugin | Custom shader (manual) |
| Indirect Rendering | DrawMeshInstancedIndirect, GPU Resident Drawer | Niagara GPU, RDG | RenderingDevice (manual, low-level) |
| Virtualized Geometry | No equivalent | Nanite | No equivalent |
Conclusion
So how do we reduce draw calls? Most techniques in this article follow the same principle: merge things to reduce the back-and-forth between CPU and GPU.
Early in development it pays to group elements that share similar properties. What do your objects have in common? What is different? Identifying shared features helps you create Uber Shaders instead of dozens of small edge-case shaders. Using Texture Atlases, Texture Arrays, and Trim Sheets reduces the number of material variations, which directly helps the engine when batching. When you need variation without creating new materials (a car that can be red or blue), reach for MaterialPropertyBlock in Unity or Custom Primitive Data in Unreal instead of duplicating materials.
Profile and debug your games. Tools like RenderDoc, combined with the knowledge from this article, will help you understand exactly what is happening on the GPU. In RenderDoc you can inspect each draw call individually, see which shader it used, how many instances it drew, and whether batching or instancing kicked in. After reading this article, those labels will mean something. Lots of similar draw calls? Consider GPU Instancing. Huge instance counts with variety? Consider VAT or Indirect Rendering.
And hopefully now you will understand what is actually happening when you toggle the SRP Batcher, the GPU Resident Drawer, or Nanite.
Working on something where this matters?
I work as a freelance graphics programmer and technical artist. If your game has performance issues you can’t quite diagnose, I offer rendering audits: a structured review of your draw calls, shader setup, and instancing strategy, with a written report that explains what is happening and why, without assuming you have a graphics engineering background.
Useful for teams who know something is slow but aren’t sure where to start, or for solo developers who want a second opinion before committing to a bigger technical overhaul.